更多模块
基本
NestJS 中,我们还有 4 个额外的功能构建块。
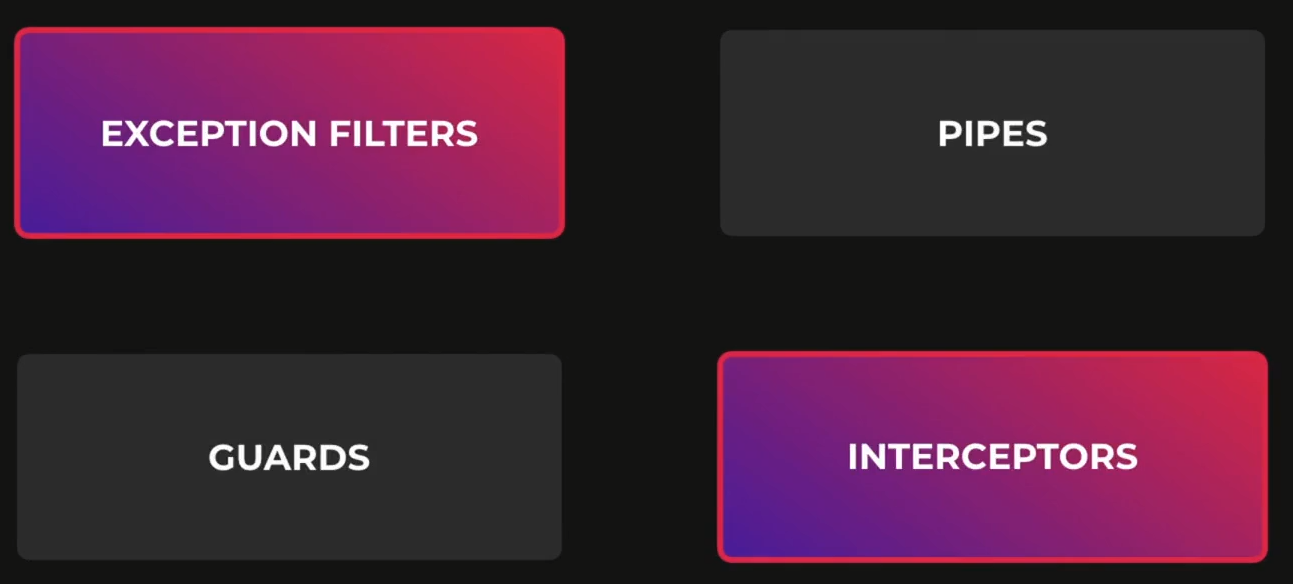
嵌套构建块可以是:
- 全局范围
- 控制器范围
- 方法范围
- 参数范围<仅适用于管道>
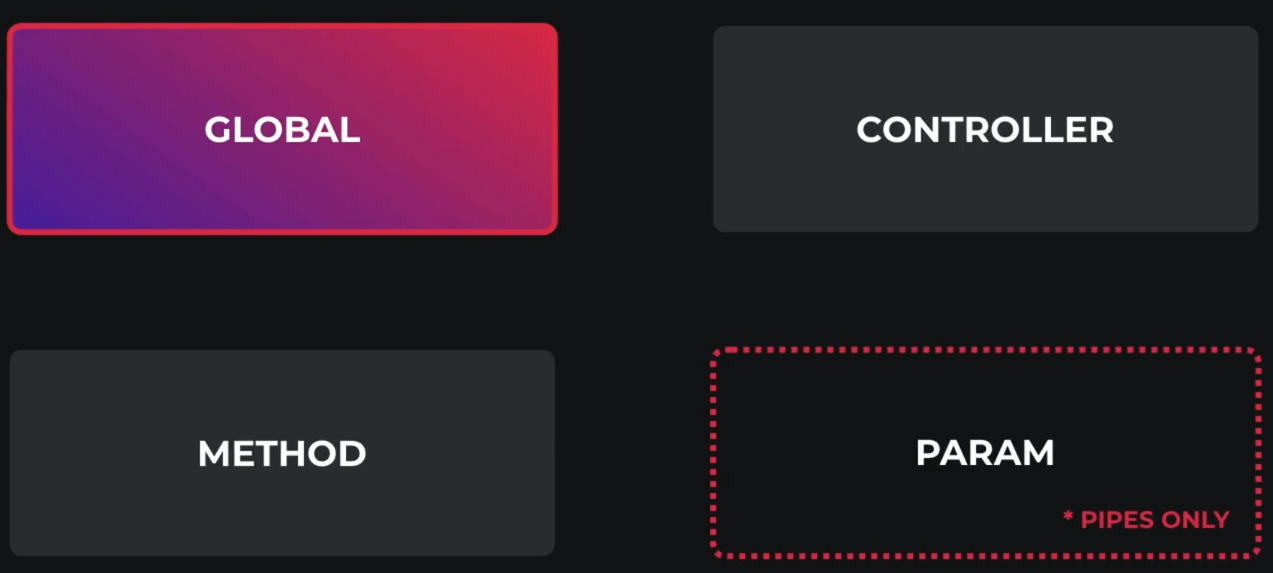
这些不同的绑定拘束为您提供了应用程序中不同级别的力度和控制,每个都不会覆盖另外一个,而是分层在顶部。
进入main.ts我们看到之前就是用过全局的管道:
import { ValidationPipe } from '@nestjs/common';
import { NestFactory } from '@nestjs/core';
import { AppModule } from './app.module';

async function bootstrap() {
  const app = await NestFactory.create(AppModule);
  app.useGlobalPipes(new ValidationPipe({
    whitelist: true,
    transform: true,
    forbidNonWhitelisted: true,
    transformOptions: {
      enableImplicitConversion: true,
    },
  }));
  await app.listen(3000);
}
bootstrap();
自行设置和实例化它的一大限制是:我们不能在这里注入任何的依赖,因为我们将它设置在任何 NestJS 模块上下文之外,那我们该如何解决这个问题呢?
我们可以选择使用基于自定义提供程序的语法直接从 Nest 模块内部设置管道
// app.module
providers: [AppService,{provide: APP_PIPE, useClass: ValidationPipe}],此APP_MODULE是由@nestjs/core中导出的特殊令牌,以这种方式提供ValidationPipe,可以让我们在AppModule的范围内实例化ValidationPipe并在创建后将其注册为全局管道<其他构建模块功能也有相同的标记>。
假设我们想将ValidationPipe绑定到仅在CoffeesController中定义的每个路由处理程序
@UsePipes(ValidationPipe)
@Controller('coffees')
export class CoffeesController {
    // ...
你也可以传递一个实例:
@UsePipes(new ValidationPipe())
@Controller('coffees')
export class CoffeesController {
// ...从而在实现this确切场景时,非常有用。当然,最佳实践为使用类而不是实例,这减少了内存使用,因为 Nest 可以在整个模块中轻松重用同一类的实例
方法范围:
  @UsePipes(ValidationPipe)
  @Get(':id')
  findOne(@Param('id') id: string) {
    // 选择传入某个字符串
    return this.coffeeService.findOne(id); // 使用 service 中的方法替换之前写的空方法
}仅适用于pipe的参数范围:
  @Patch(':id')
  update(@Param('id') id: string, @Body(ValidationPipe) updateCoffeeDto: UpdateCoffeeDto) {
    return this.coffeeService.update(id, updateCoffeeDto);
  }
捕捉异常 ExceptionFilter
// nest g filter common/filters/http-exceptionimport {
ArgumentsHost,
Catch,
ExceptionFilter,
HttpException,
} from '@nestjs/common';
import { Response } from 'express';
@Catch(HttpException) // 处理的是 HttpException
export class HttpExceptionFilter<T extends HttpException>
implements ExceptionFilter
{
catch(exception: T, host: ArgumentsHost) {
const ctx = host.switchToHttp(); // 这个 switchToHttp 可以使我们能够访问本机飞行请求或响应对象
const response = ctx.getResponse<Response>(); // 此方法返回我们的底层平台响应,默认情况下是 Express
const status = exception.getStatus();
const exceptionResponse = exception.getResponse(); // 获取原始异常响应
const error =
typeof response === 'string' // 为了错误统一返回 object
? { message: exceptionResponse }
: (exceptionResponse as object);
response.status(status).json({
...error
}); // 发回响应设置 statusCode
}
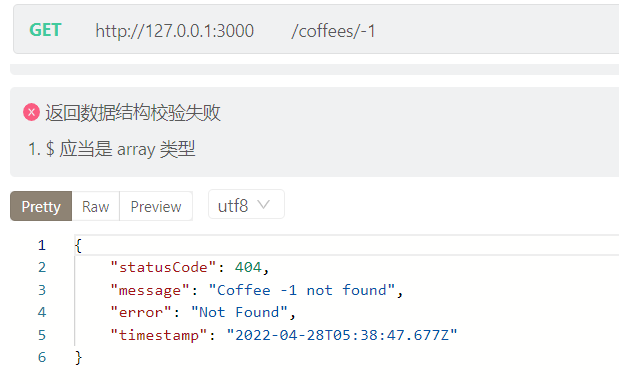
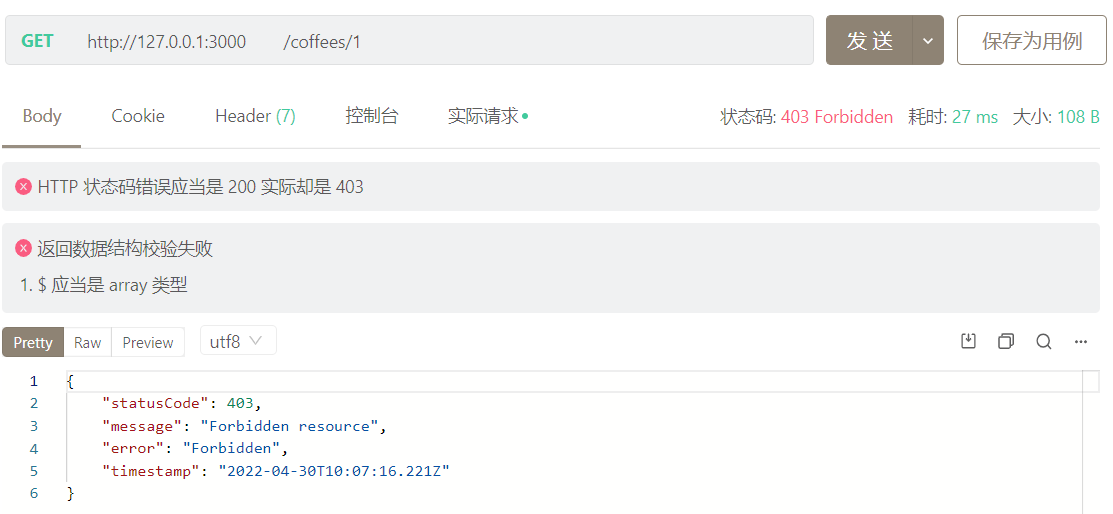
}到目前为止,这里的HttpExceptionFilter还没有任何真正做任何独特的事情。
比如现在我们可以增加这个信息;
    response.status(status).json({
      ...error,
      timestamp: new Date().toISOString()   // 增加的
    });  // 发回响应设置 statusCode
由于我们不需要任何外部提供程序,因此我们可以使用 main.ts 文件中的 app 实例全局绑定这个ExceptionFilter。
async function bootstrap() {
const app = await NestFactory.create(AppModule);
// ...
app.useGlobalFilters(new HttpExceptionFilter)
await app.listen(3000);
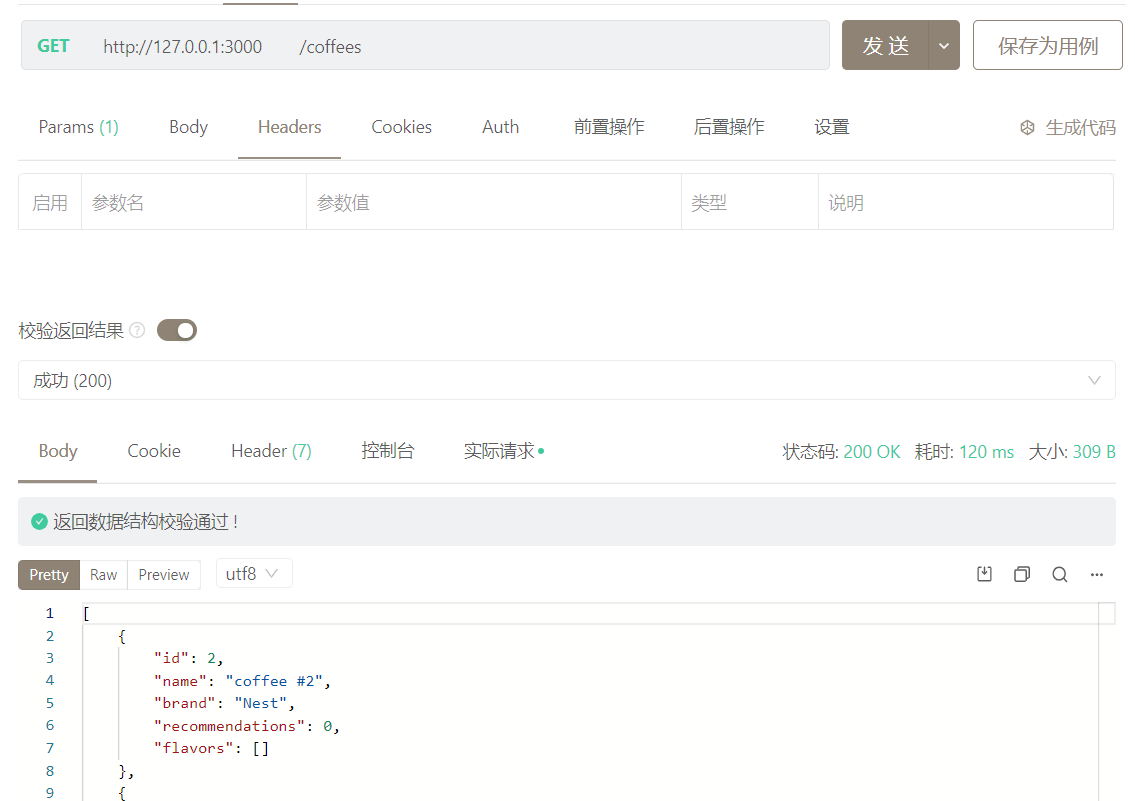
}然后现在我们测试它:
路由守卫
可以用来检验 token 是否有效,从而进行下一步的请求
首先创建一个负责两件事的Guard:
- 验证
API_KEY是否存在于授权标头中; - 其次确定是否将正在访问的路由指定为公共的(私有的必须有
API_KEY才能访问);
首先:
// nest g guard common/guard/api-keycommon 这个文件夹我们可以在其中保存任何与特定于无关的东西。
守卫的一个重要要求就是要实现从@nest/common导出的canActive接口
import { CanActivate, ExecutionContext, Injectable } from '@nestjs/common';
import { Observable } from 'rxjs';

@Injectable()
export class ApiKeyGuard implements CanActivate {
  canActivate(
    context: ExecutionContext,
  ): boolean | Promise<boolean> | Observable<boolean> {  // 可以返回的类型
    return true;
  }
}这个类返回的bool值指定当前请求是被允许继续还是拒绝访问。
然后在main.ts中添加我们新的ApiGuard的appUseGlobalCuards();
async function bootstrap() {
  const app = await NestFactory.create(AppModule);
// ...
  app.useGlobalGuards(new ApiKeyGuard);
  await app.listen(3000);
}为了保证api_key不被推送,我们将api_key定义为环境变量。
// .env
// ...
APP_KEY=67whdwjh27uhd2duhw8d2udhiwjd- 然后在守卫这里,我们希望任何未标记为公共的请求需要验证
API_KEY; - 这里假设调用者将此密钥作为
authorization header传递; - 获取 HTTP 请求相关的信息,我们需要从继承自
ArgumentsHost的ExecutionContext访问它;
//  api-key.guard
import { CanActivate, ExecutionContext, Injectable } from '@nestjs/common';
import { Observable } from 'rxjs';
import { Request } from 'express';

@Injectable()
export class ApiKeyGuard implements CanActivate {
  canActivate(
    context: ExecutionContext,
  ): boolean | Promise<boolean> | Observable<boolean> {
    const request = context
      .switchToHttp() // 这个方法可以让我们访问本机运行中的 Request\Response\Next objects
      .getRequest<Request>();
    const authHeader  = request.header('Authorization');
    return authHeader === process.env.API_KEY;
  }
}
然后测试它:


这里我们需要实现上一节提到的检测当前路由是否被声明为公共的。
@SetMetadata
那么我们该以哪种方式指定应用程序中的哪些端点是公共的呢?或者想要任何数据与控制器或路由一起存储?
这就是自定义元数据发挥作用的地方:@SetMetadata
// coffees.controller
@SetMetadata('isPublic', true)  // 以 k,v 存储数据
@Get()
findAll(@Query() paginationQuery: PaginationQueryDto) {
    return this.coffeeService.findAll(paginationQuery);
}
封装装饰器
上述做法并不是最佳实践,我们可以自定义装饰器@public来实现同样的功能。
首先,在/common/下创建一个名为decorators的文件夹用来存储我们可能制作的任何其他未来的装饰器,然后创建public.decorator,这个文件我们要导出两个东西:
import { SetMetadata } from "@nestjs/common";

export const IS_PUBLIC_KEY = true;  // 导出它我们就可以在任何地方查看这个元数据

export const Public = ()=>SetMetadata(IS_PUBLIC_KEY, true);
然后换掉:
@Public()
@Get()
findAll(@Query() paginationQuery: PaginationQueryDto) {
    return this.coffeeService.findAll(paginationQuery);
}
Reflector 类
为了在路由守卫中访问我们的路由元数据,我们需要使用Reflector类,它允许我们在特定上下文检索元数据。
首先在constructor中注入该类:
import { CanActivate, ExecutionContext, Injectable } from '@nestjs/common';
import { Observable } from 'rxjs';
import { Request } from 'express';
import { Reflector } from '@nestjs/core';
import { IS_PUBLIC_KEY } from '../decorators/public.decorator';
import { ConfigService } from '@nestjs/config';

@Injectable()
export class ApiKeyGuard implements CanActivate {
  constructor(
    private readonly reflector: Reflector,  // 这里
    private readonly configService: ConfigService,
  ) {}
  canActivate(
    context: ExecutionContext,
  ): boolean | Promise<boolean> | Observable<boolean> {
    const isPublic = this.reflector.get(IS_PUBLIC_KEY, context.getHandler()); // 第二个参数为目标上下文
    if (isPublic) return true;  // 公共的直接返回
    const request = context
      .switchToHttp() // 这个方法可以让我们访问本机运行中的 Request\Response\Next objects
      .getRequest<Request>();
    const authHeader = request.header('Authorization');

    return authHeader === this.configService.get('API_KEY');  // 不应该使用 process.env.API_KEY,所以替换为现在这样
  }
}
这时候直接运行会出现如下错误:
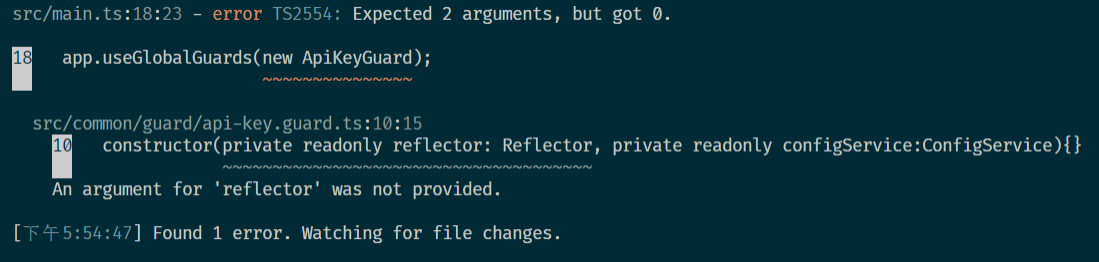
这是因为依赖于其他类的全局守卫必须在@Module上下文中注册(这样才能被实例化),我们可以直接在/common/文件夹中创建一个module文件nest g mo common
// common.module
import { Module } from '@nestjs/common';
import { ConfigModule } from '@nestjs/config';
import { APP_GUARD } from '@nestjs/core';
import { ApiKeyGuard } from './guard/api-key.guard';

@Module({
  imports: [ConfigModule],  // 为了使用 ConfigService
  providers: [{provide: APP_GUARD, useClass: ApiKeyGuard}]
})
export class CommonModule {}这里局部配置了,所以我们需要在main.ts中删除useGlobalGuard;
测试发现不设置任何的 headers 也能请求成功:
而请求没有@Public的路由并不设置 Headers 会请求失败。
拦截器
拦截器通过向现有代码添加额外的行为而无需修改代码本身,它可以使我们:
在方法执行之前或之后绑定额外的逻辑;
转换从方法返回的结果;
转换方法抛出的异常;
扩展基本方法行为;
甚至覆盖一个方法-取决于特定条件
例如做一些像缓存各种响应这样的事情;
这里创建一个例子,希望我们所有的响应都有data属性。这里创建的拦截器将拦截处理所有传入的请求,并自动为我们包装我们的数据:
初始
// nest g interceptor common/interceptor/wrap-response同样,这里需要实现一个NestInterceptor接口:
import { CallHandler, ExecutionContext, Injectable, NestInterceptor } from '@nestjs/common';
import { Observable } from 'rxjs';

@Injectable()
export class WrapResponseInterceptor implements NestInterceptor {
  intercept(context: ExecutionContext, next: CallHandler): Observable<any> {  // 返回 RXJS,是一种 promise 的强大替代品
    return next.handle();  // 使用此方法在拦截器中调用路由处理程序方法,如果没有调用 handle()方法,路由处理程序将不会被执行
    // 这相当于允许我们在 handle 之前和之后实现自定义逻辑
  }
}
log 例子
<注意如何在之后自定义逻辑的>:
import {
CallHandler,
ExecutionContext,
Injectable,
NestInterceptor,
} from '@nestjs/common';
import { Observable, tap } from 'rxjs';
@Injectable()
export class WrapResponseInterceptor implements NestInterceptor {
intercept(context: ExecutionContext, next: CallHandler): Observable<any> {
// 返回 RXJS,是一种 promise 的强大替代品
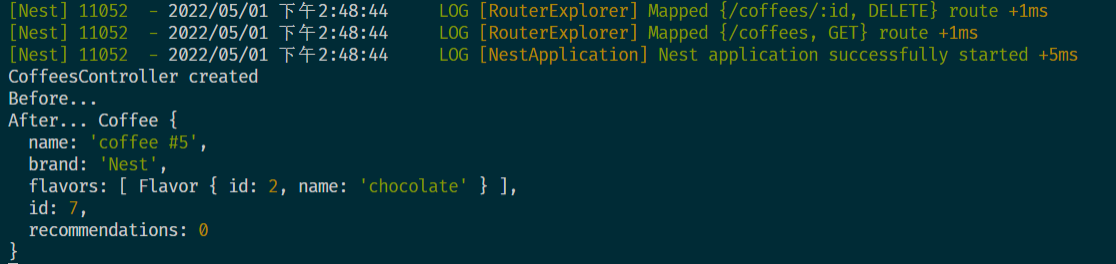
console.log('Before...');
return next.handle().pipe(tap((data) => console.log('After...', data))); // 使用此方法在拦截器中调用路由处理程序方法,如果没有调用 handle()方法,路由处理程序将不会被执行
// 这相当于允许我们在 handle 之前和之后实现自定义逻辑
}
}
// tap()在 Observable 流正常终止时调用 Log 函数,并且不会干扰响应周期。同样我们还是需要将其导入才能使用(这里是全局导入):
async function bootstrap() {
  const app = await NestFactory.create(AppModule);
// ...
  app.useGlobalInterceptors(new WrapResponseInterceptor());
  await app.listen(3000);
}
然后测试 POST 一个请求创建 coffee 之后:
数据包装器
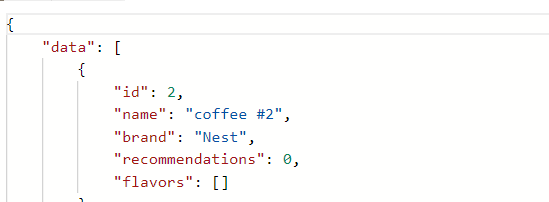
现在我们实现最开始提到的数据包装器:
@Injectable()
export class WrapResponseInterceptor implements NestInterceptor {
  intercept(context: ExecutionContext, next: CallHandler): Observable<any> {
    // 返回 RXJS,是一种 promise 的强大替代品
    console.log('Before...');

    return next.handle().pipe(map((data)=>({data})))  // map()从流中获取一个值并返回修改后的值
  }
}
测试(被包裹在 data 属性下面了):
处理超时
nest g interceptor common/interceptor/timeoutimport { CallHandler, ExecutionContext, Injectable, NestInterceptor } from '@nestjs/common';
import { Observable, timeout } from 'rxjs';
@Injectable()
export class TimeoutInterceptor implements NestInterceptor {
intercept(context: ExecutionContext, next: CallHandler): Observable<any> {
return next.handle().pipe(timeout(3000)); // 意味着 3 秒之后自动取消
}
}同样将其绑定到全局:
// main.ts
app.useGlobalInterceptors(new WrapResponseInterceptor(), new TimeoutInterceptor());
// 这里可以绑定多个拦截器,只需要将其用逗号隔开就可以了
测试(这里在 findall 里面设置一个很长的 setimeout 来模拟)
// 测试用例
async findAll(@Query() paginationQuery: PaginationQueryDto) {
    await new Promise(resolve => setTimeout(resolve, 5000))
    return this.coffeeService.findAll(paginationQuery);
}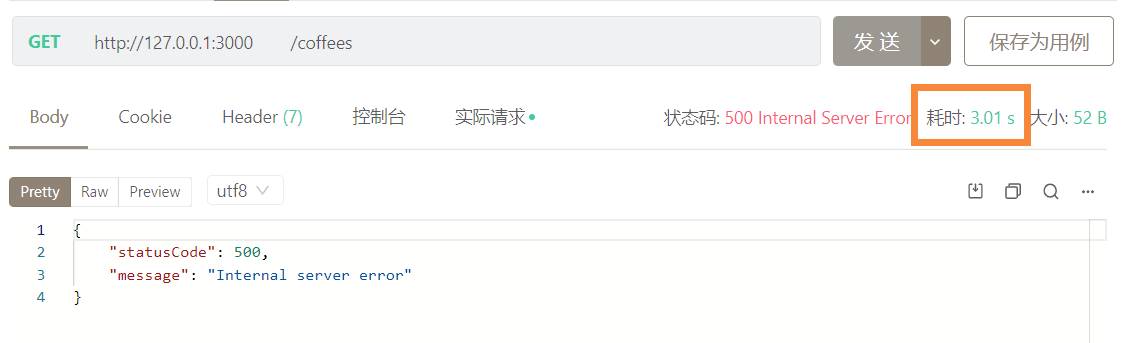
然而这个 message 并不是特别的友好,我们应该如何修改它呢?
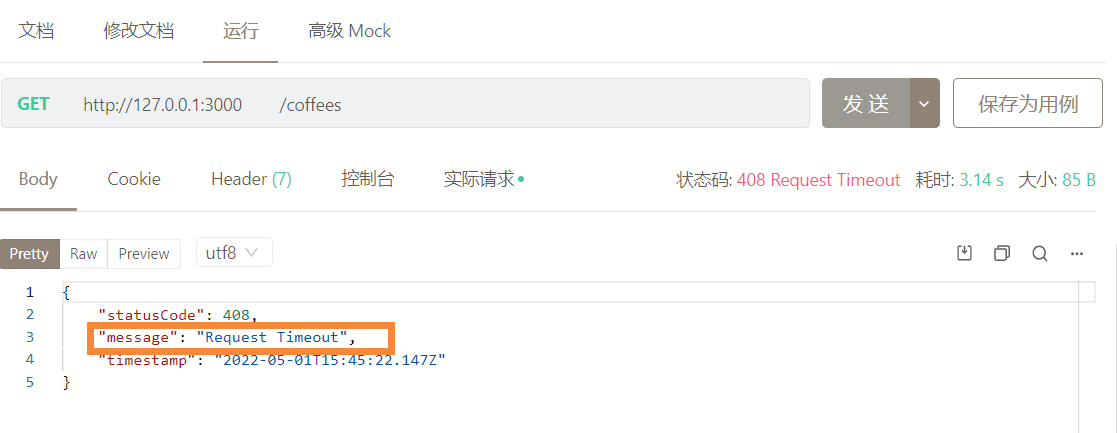
@Injectable()
export class TimeoutInterceptor implements NestInterceptor {
  intercept(context: ExecutionContext, next: CallHandler): Observable<any> {
    return next.handle().pipe(
      timeout(3000),
      catchError((err) => {  // 捕获流中的错误
        if(err instanceof TimeoutError){
          return throwError(() => new RequestTimeoutException())
        }
        return throwError(() => err);
      }),
    );
  }
}
创建常规管道
先前
管道通常的两个用例:
- 转换
- 验证
nest 在方法被调用前除法一个管道,管道也会接收要传递给方法的参数,nest 提供了几个开箱即用的管道:
- ValidationPipe
- ParseArrayPipe:解析和验证数组;
构建自己的 Pipes
创建一个管道,它会自动将任何传入的字符串解析为整数ParseIntPipe(当然 nest 已经有现成的 pipe 可以使用,这里为了学习而重新实现)
// nest g pipe common/pipes/parse-int和之前的差不多,这里需要实现的是PipeTransform接口
import { ArgumentMetadata, Injectable, PipeTransform } from '@nestjs/common';

@Injectable()
export class ParseIntPipe implements PipeTransform {
  transform(value: any, metadata: ArgumentMetadata) {
    return value;
  }
}
添加转换的逻辑:
import {
  ArgumentMetadata,
  BadRequestException,
  Injectable,
  PipeTransform,
} from '@nestjs/common';

@Injectable()
export class ParseIntPipe implements PipeTransform {
  transform(value: string, metadata: ArgumentMetadata) {
    // value: 当前处理的参数在路由处理方法接收之前的输入值, metadata: 当前处理参数的元数据
    const val = parseInt(value, 10);
    if (isNaN(val)) {
      throw new BadRequestException(
        `Validation falied. "${val} is not an integer"`,
      );
    }
    return val;
  }
}现在,我们就可以将我们的管道绑定到@Param()上了;
@Get(':id')
findOne(@Param('id', ParseIntPipe) id: string) {  // 作为第二个参数传入
    return this.coffeeService.findOne(id);
}
// 如果不做处理,当我们传入 abc 作为参数时,会返回 500,而这里处理之后则会返回更加友好的状态信息 400 以及错误原因。
中间件
中间件是一个在处理路由处理程序和其他构建块之前调用的函数,这包括了拦截器、守卫和管道。中间件可以访问请求和响应对象,并且不专门绑定到任何方法,而是绑定到指定的路由路径。中间件函数可以执行以下任务:
- 执行代码
- 更改请求和响应对象
- 结束请求响应周期
- 甚至在调用堆栈中调用
next()中间件函数
使用中间件是时,如果当前中间件函数没有结束请求/响应周期,它就必须调用next()方法,该方法将控制权传递给下一个中间件函数,否则,请求将被挂起永远不会完成。
中间件可以是函数和类:
- 函数中间件是无状态的,它不能被注入依赖项,并且无权访问 nest 容器;
- 类中间件可以依赖外部依赖并注入在同一模块范围内的提供程序;
创建:
// nest g middleware common/middleware/logging同样这里需要实现NestMiddleware接口:
import { Injectable, NestMiddleware } from '@nestjs/common';

@Injectable()
export class LoggingMiddleware implements NestMiddleware {
  use(req: any, res: any, next: () => void) {
    next();
  }
}在这之前先要在common.module中去注册它,在这里,我们首先要确保CommonModule继承于NestModule接口,这个接口需要我们提供configure()方法它以MiddlewareConsumer作为参数。MiddlewareConsumer提供了一组有用的方法来将中间件绑定到特定的路由。
import { MiddlewareConsumer, Module, NestModule, RequestMethod } from '@nestjs/common';
import { ConfigModule } from '@nestjs/config';
import { APP_GUARD } from '@nestjs/core';
import { ApiKeyGuard } from './guard/api-key.guard';
import { LoggingMiddleware } from './middleware/logging.middleware';

@Module({
  imports: [ConfigModule],  // 为了使用 ConfigService
  providers: [{provide: APP_GUARD, useClass: ApiKeyGuard}]
})
export class CommonModule implements NestModule {
  configure(consumer: MiddlewareConsumer) {
      consumer.apply(LoggingMiddleware).forRoutes('*');  // 这里将其绑定到所有路由上
      // consumer.apply(LoggingMiddleware).forRoutes({path: 'coffees', method: RequestMethod.GET});  // 这里将其绑定到特定路由特定方法上
      // consumer.apply(LoggingMiddleware).exclude('coffees').forRoutes('*');  // 这里先排除某类路由
  }
}
实现一个记录往返时间的中间件:
import { Injectable, NestMiddleware } from '@nestjs/common';

@Injectable()
export class LoggingMiddleware implements NestMiddleware {
  use(req: any, res: any, next: () => void) {
    console.time("Request-response time");
    console.log("Hi from middleware!");
    res.on('finish', ()=>console.timeEnd('Request-response time'))
    next();
  }
}
自定义装饰器
这里创建一个获取协议的参数装饰器(效果和@Body获取request.body差不多):
import { createParamDecorator, ExecutionContext } from "@nestjs/common";

export const Protocol =  createParamDecorator(  // 这个方法
  (data: unknown, ctx: ExecutionContext)=>{  // data 是获取装饰器传递过来的参数,如@Protocol('https')就是 h
    const request = ctx.switchToHttp().getRequest();
    return request.protocol;
  }
)
使用:
@Public()
@Get()
async findAll(@Protocol() protocol, @Query() paginationQuery: PaginationQueryDto) {
    console.log(protocol);
    return this.coffeeService.findAll(paginationQuery);
}