threejs 动画系统
此笔记记录于DISCOVER three.js,大多数为其中的摘要,少数为笔者自己的理解
基本介绍
three.js 动画系统是一个完整的动画调音台。 使用这个系统,您几乎可以为对象的任何方面设置动画,例如位置、缩放、旋转、材质的颜色或不透明度、 蒙皮网格的骨骼、 变形目标以及许多其他内容。
动画系统使用关键帧来定义动画。为了创建动画,我们在特定时间点设置关键帧,然后动画系统使用称为补间的过程为我们填补空白。
关键帧
每个关键帧由三部分信息组成:时间**time、属性property**和值 value,例如:
- 在 0 秒
.position是(0,0,0)。 - 在 3 秒
.scale是(1,1,1)。 - 在 12 秒
.material.color是红色。
动画系统支持五种数据类型。
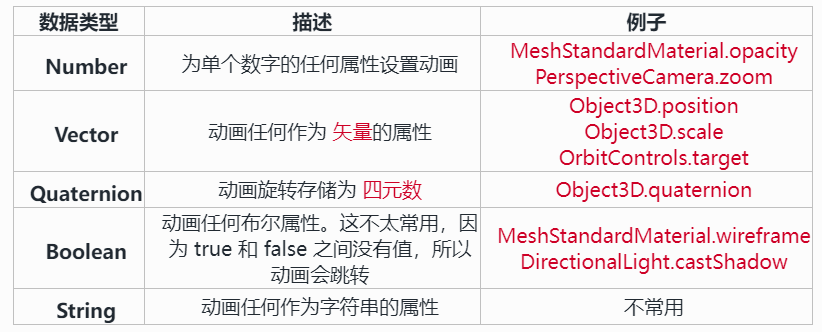
此列表中明显缺少的是 欧拉角,如果您从我们关于变换的章节中回想一下,它类似于向量并用于将旋转存储在
Object3D.rotation。 要为旋转设置动画,您必须使用Object3D.quaternion。
KeyframeTrack
关键帧是存储在两个数组中的原始数据,时间 和 值,在 KeyframeTrack中。
KeyframeTrack是基类,每种数据类型都有一个子类:
NumberKeyframeTrackVectorKeyframeTrackQuaternionKeyframeTrackBooleanKeyframeTrackStringKeyframeTrack
我们从不直接使用KeyframeTrack,相反,我们将选择与动画数据类型匹配的任何子类。
创建一个代表不透明度的数字关键帧轨迹,包含五个关键帧:
import { NumberKeyframeTrack } from "three";

const times = [0, 1, 2, 3, 4];
const values = [0, 1, 0, 1, 0];

const opacityKF = new NumberKeyframeTrack(".material.opacity", times, values);
AnimationClip
这 53 条轨迹共同创建了动画,我们称之为动画剪辑。因此,动画剪辑是附加到单个对象的任意数量的关键帧的集合,表示剪辑的类是 AnimationClip。从这里开始,我们将动画剪辑简称为 剪辑。动画片段可以循环播放,因此,虽然这个舞者的动画时长为 18 秒,但当它到达结尾时,它会循环播放,并且舞者会永远跳下去。

让我们创建一个包含之前的单个位置轨迹的剪辑:
import { AnimationClip, VectorKeyframeTrack } from "three";

const times = [0, 3, 6];
const values = [0, 0, 0, 2, 2, 2, 0, 0, 0];

const positionKF = new VectorKeyframeTrack(".position", times, values);

// just one track for now
const tracks = [positionKF];

// use -1 to automatically calculate
// the length from the array of tracks
const length = -1;

const clip = new AnimationClip("slowmove", length, tracks);
AnimationMixer
要使用动画系统为诸如网格之类的对象设置动画,我们必须将其连接到 AnimationMixer。我们需要为场景中的每个动画对象使用一个混合器。 混合器执行使模型及时移动到动画剪辑的技术工作,无论是移动舞者的脚、手臂和臀部,还是飞鸟的翅膀。
import { Mesh, AnimationMixer } from 'three';

// create a normal, static mesh
const mesh = new Mesh();

// turn it into an animated mesh by connecting it to a mixer
const mixer = new AnimationMixer(mesh);
我们还需要在每一帧更新混合器
AnimationAction
AnimationAction将动画对象连接到动画剪辑。类AnimationAction也是暂停、播放、循环和重置等控件所在的位置。与其他动画系统类不同,我们从不直接创建动作。相反,我们将使用 AnimationMixer.clipAction,它确保动作被混合器缓存。
使用.clipAction创建一个AnimationAction
import { AnimationClip, AnimationMixer } from "three";

const moveBlinkClip = new AnimationClip("move-n-blink", -1, [
  positionKF,
  opacityKF,
]);

const mixer = new AnimationMixer(mesh);
const action = mixer.clipAction(moveBlinkClip);
创建一个 action 然后将其状态设置为正在播放
const mixer = new AnimationMixer(humanModel);

const action = mixer.clipAction(walkClip);

// immediately set the animation to play
action.play();

// later, you can stop the action
action.stop();请注意,虽然我们调用了.play,但动画还没有开始。我们仍然需要更新动画循环中的混合器,我们稍后会做。
假设这个角色也可以跑和跳。每个动画都将出现在一个单独的剪辑中,并且每个剪辑必须连接到一个动作。因此,就像混合器和模型之间存在一对一的关系一样,动作和动画剪辑之间也存在一对一的关系。
const mixer = new AnimationMixer(humanModel);

const walkAction = mixer.clipAction(walkClip);
const runnAction = mixer.clipAction(runClip);
const jumpAction = mixer.clipAction(jumpClip);
下一步是选择要播放这些动作中的哪一个。你如何处理这些将取决于你正在构建什么样的场景。例如,如果它是一个游戏,您会将这些动作连接到用户控件,这样当按下相应的按钮时,角色就会行走、奔跑或跳跃。另一方面,如果它是一个不可玩的角色,你可以将它们连接到一个 AI 系统并让它控制角色的动作。
更新循环中的动画
在播放任何动画之前只剩下一件事要做。我们需要在动画循环中更新动画对象。混合器有一个更新方法,它带有一个时间delta参数。无论我们传递多少时间给mixer.update,连接到混合器的所有操作都将向前移动该时间。
const mixer = new AnimationMixer(mesh);
const clock = new Clock();

// you must do this every frame
const delta = clock.getDelta();
mixer.update(delta);const mixer = new AnimationMixer(mesh);
mesh.tick = (delta) => mixer.update(delta);
updatables.push(mesh);setModels.js
import { AnimationMixer } from 'three';

function setupModel(data) {
  const model = data.scene.children[0];
  const clip = data.animations[0];

  const mixer = new AnimationMixer(model);
  const action = mixer.clipAction(clip);
  action.play();

  model.tick = (delta) => mixer.update(delta);

  return model;
}

export { setupModel };
World.js
import { loadBirds } from './components/birds/birds.js';
import { createCamera } from './components/camera.js';
import { createLights } from './components/lights.js';
import { createScene } from './components/scene.js';

import { createControls } from './systems/controls.js';
import { createRenderer } from './systems/renderer.js';
import { Resizer } from './systems/Resizer.js';
import { Loop } from './systems/Loop.js';

let camera;
let controls;
let renderer;
let scene;
let loop;

class World {
  constructor(container) {
    camera = createCamera();
    renderer = createRenderer();
    scene = createScene();
    loop = new Loop(camera, scene, renderer);
    container.append(renderer.domElement);
    controls = createControls(camera, renderer.domElement);

    const { ambientLight, mainLight } = createLights();

    loop.updatables.push(controls);
    scene.add(ambientLight, mainLight);

    const resizer = new Resizer(container, camera, renderer);
  }

  async init() {
    const { parrot, flamingo, stork } = await loadBirds();

    // move the target to the center of the front bird
    controls.target.copy(parrot.position);

    loop.updatables.push(parrot, flamingo, stork);
    scene.add(parrot, flamingo, stork);
  }

  render() {
    renderer.render(scene, camera);
  }

  start() {
    loop.start();
  }

  stop() {
    loop.stop();
  }
}

export { World };